
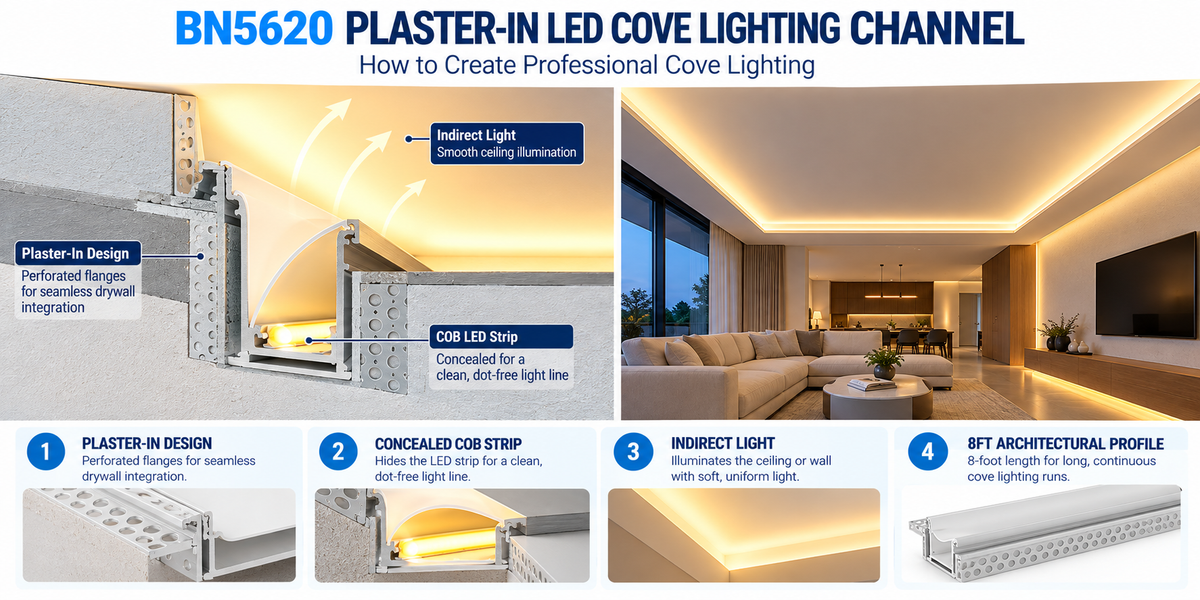
How to Create Professional Cove Lighting with a Plaster-In LED Channel
Cove lighting can completely change how a room feels without adding another visible light fixture.
Instead of directing light straight into the room, a concealed LED source illuminates an adjacent ceiling or wall. The reflected light then becomes part of the architecture.
The concept sounds simple:
Hide an LED strip → Aim light at a surface → Create indirect illumination
But achieving a professional result requires much more planning.
Poorly designed cove lighting can create:
- Visible LED strips
- Uneven bright and dark areas
- Harsh hotspots
- Crooked light lines
- Visible aluminum profiles
- Difficult-to-service wiring
- Excessive voltage drop
- Inconsistent brightness
A purpose-built architectural profile such as the BN5620 Plaster-In LED Cove Lighting Channel solves an important part of this problem by creating the actual cove structure and LED mounting location as part of the drywall construction.
This guide explains how to plan a complete professional cove lighting system around that type of profile.
What Is Cove Lighting?
Cove lighting is a form of indirect architectural lighting.
The light source is concealed so that occupants primarily see:
the illuminated surface
rather than:
the LED strip itself.
A typical system looks like:
LED Strip → Ceiling or Wall → Reflected Light → Room
This produces a very different effect from downlights.
Downlights provide directional illumination from visible ceiling openings.
Cove lighting can create a softer layer of reflected illumination around the architecture.
That makes it especially useful when combining direct and indirect lighting in the same project. BrightNex already recommends treating these as separate lighting layers rather than trying to make every source equally bright — our guide on combining downlights and LED strips covers how to assign each layer a job.
Why the Channel Matters More Than Many Installers Expect
A common approach to cove lighting is to build a drywall ledge and simply attach LED strip somewhere inside it.
That can work.
But the final result depends heavily on:
- How straight the mounting surface is
- Strip position
- Strip angle
- Distance from the illuminated surface
- Heat management
- Concealment
- Wiring
- Construction tolerances
A dedicated cove profile provides a controlled architectural structure for the LED system.
Instead of treating the LED strip as something added after construction, the lighting becomes part of the architectural detail.
What Makes BN5620 Different from a Standard LED Channel?
The BN5620 is not simply a narrow aluminum extrusion for holding LED strip.
It is a much larger architectural profile designed specifically to form a plaster-in cove detail.
Its key specifications include:
- Length: 8 ft
- Material: Aluminum
- Installation: Plaster-In / Recessed
- Application: Cove Lighting
- Overall Profile Height: approximately 3.945"
- LED Compartment Width: approximately 0.598"
- Diffuser: Included
- Perforated flanges: designed for drywall/plaster integration
That approximately 3.945-inch overall height is important.
This is not just a small strip holder hidden in a prebuilt cove.
The profile itself helps create the architectural cove structure.
How Plaster-In Cove Lighting Creates a Cleaner Finish
The BN5620 uses perforated mounting flanges that are integrated into the drywall finishing process.
After installation, drywall compound or plaster covers the transition between the profile and surrounding construction.
The edges visually disappear.
Instead of seeing:
Wall → Aluminum Channel → Light
the finished effect becomes closer to:
Wall → Architectural Cove → Light
Only the intended lighting detail remains visually prominent.
This is one of the primary advantages of plaster-in profiles in minimalist architectural interiors.
Where Can BN5620 Be Used?
The profile is designed for applications including:
- Ceiling coves
- Wall coves
- Perimeter lighting
- Indirect ceiling illumination
- Hallways
- Corridors
- Hotels
- Restaurants
- Retail interiors
- Modern residential spaces
- Commercial architectural projects
But the same profile can create very different effects depending on where and how it is positioned.
Let's look at the most useful applications.
1. Perimeter Ceiling Cove Lighting
One of the strongest applications is around the perimeter of a room.
The profile can create a continuous lighting detail near the wall/ceiling transition.
The light washes onto the adjacent ceiling surface.
Visually, this can make the ceiling appear to float.
This approach works particularly well in:
- Hotel lobbies
- Restaurants
- Reception areas
- Luxury residential interiors
- Conference rooms
- Retail environments
The important design principle is:
Do not design the cove around the LED strip alone. Design it around the surface you want to illuminate.
2. Feature-Wall Cove Lighting
BN5620 can also be incorporated into a wall detail.
Instead of illuminating the ceiling, the concealed source can emphasize an adjacent architectural surface.
This can work well around:
- Textured walls
- Stone
- Wood panels
- Reception walls
- Restaurant features
- Hospitality interiors
However, surface texture matters.
A rough stone wall will interact with grazing or indirect light very differently from smooth painted drywall.
A mock-up is highly recommended for premium projects.
3. Hallway and Corridor Lighting
Long corridors are ideal places for linear architectural lighting.
A continuous cove can visually guide people through the space while reducing reliance on a ceiling filled with decorative fixtures.
Possible applications include:
- Hotels
- Offices
- Apartment buildings
- Healthcare interiors
- Commercial corridors
For long runs, however, electrical planning becomes especially important.
More on that shortly.
4. Hospitality Lighting
Hotels and restaurants often benefit from multiple lighting layers.
For example:
Downlights → Functional illumination
Cove lighting → Architectural atmosphere
Accent lighting → Artwork or material highlights
Decorative fixtures → Visual identity
Cove lighting should have a specific job within that hierarchy.
Making every layer extremely bright usually creates a flatter, less intentional design.
5. Retail Lighting
Retail environments can use cove lighting to define:
- Perimeter architecture
- Display areas
- Ceiling transitions
- Brand zones
- Customer circulation
But cove lighting usually should not replace task or merchandise lighting entirely.
It works best as one layer of a complete retail lighting design.
Why COB LED Strip Is a Strong Choice for Cove Lighting
For this type of project, COB LED strip is often an excellent match.
COB technology creates a much more continuous-looking luminous line than traditional widely spaced LED packages.
That helps when:
- The strip may occasionally be visible from certain angles
- Reflections occur on glossy surfaces
- A diffuser is used
- The architectural detail is close to the viewer
However, there is an important point:
COB does not fix poor cove geometry.
Even a perfectly smooth COB strip can create bad cove lighting if it is positioned incorrectly.
Check Strip Width Before Installation
BN5620 has an LED compartment approximately 0.598 inches wide, or roughly 15.2 mm.
That provides useful space for common LED strip widths — our 8mm and 10mm COB strips both fit comfortably — but you should never select the strip based only on a nominal number.
Always verify:
- Actual PCB width
- Connector width
- Solder-joint clearance
- Wire entry
- Diffuser clearance
BrightNex specifically recommends confirming the actual strip width before installation.
This is especially important if using connectors wider than the strip itself.
Do You Even Need a Diffuser in Cove Lighting?
This is an interesting question because the LED strip is already concealed.
BN5620 includes a diffuser over its dedicated LED compartment.
A diffuser can provide:
- Physical strip protection
- Cleaner appearance during installation
- Additional light blending
- Reduced direct visibility from unusual viewing angles
However, the primary optical mechanism in cove lighting is still the reflected surface.
The ceiling or wall is effectively acting as another large optical surface.
The Most Important Rule: Hide the Source, Not the Light
Good cove lighting allows the viewer to see the effect without seeing the source.
From normal positions in the room, you ideally want:
Illuminated Ceiling
not:
Bright LED Strip
This means the profile position should be checked against real viewing angles.
Consider:
- Standing position
- Sitting position
- Stairways
- Mezzanines
- Adjacent rooms
- Mirrors and reflective surfaces
A strip that is hidden while standing in the center of a room may become visible from another angle.
Cove Distance Changes the Lighting Effect
One of the biggest design variables is the relationship between the LED source and the surface being illuminated.
If the light source is very close to the ceiling, you may create:
- A concentrated bright band
- Faster falloff
- More visible irregularities
With more distance, the light can spread more broadly.
But excessive distance may reduce intensity.
Therefore, there is no universal perfect spacing.
The ideal geometry depends on:
- LED output
- Beam behavior
- Ceiling height
- Surface reflectance
- Desired brightness
- Cove shape
For important projects, build a mock-up.
Surface Color Matters
Cove lighting relies heavily on reflected light.
That means surface color can significantly change the result.
White Surface
Typically reflects more visible light.
Dark Surface
Absorbs more light and may require greater output to create the same perceived effect — a higher-output strip such as our 10mm 480 LEDs/m COB may be the better specification.
Colored Surface
Can influence the apparent color of the reflected illumination.
A warm white LED shining onto a strongly colored wall will not necessarily look identical to the same strip illuminating neutral white drywall.
Glossy vs. Matte Surfaces
Finish matters too.
A glossy surface may produce stronger reflections and sometimes reveal the LED source or irregularities.
A matte surface tends to diffuse reflected light more broadly.
Always consider the actual finished material—not just the architectural drawing.
Choose Color Temperature for the Space
Typical architectural LED strip options might include:
- 2700K
- 3000K
- 3500K
- 4000K
- Other project-specific temperatures
There is no universally best CCT.
2700K–3000K
Often works well for:
- Restaurants
- Hotels
- Residential interiors
- Lounges
3500K–4000K
May be appropriate for:
- Offices
- Retail
- Commercial interiors
- Contemporary workspaces
If cove lighting is combined with downlights, try to coordinate their color temperatures unless a deliberate contrast is part of the design. Where the client wants the cove to shift between warm and neutral white, a CCT-adjustable COB strip with a CCT driver can cover both.
CRI Matters in Indirect Lighting Too
Because cove light reflects from walls, ceilings, furniture, and architectural materials, color rendering still matters.
Higher-quality color rendering can improve how materials such as:
- Wood
- Stone
- Fabric
- Paint
- Merchandise
appear under the reflected illumination.
For retail and hospitality environments, this can be particularly important. CRI is listed on each COB strip product page.
How Bright Should Cove Lighting Be?
Do not select the strip solely by asking:
“What is the brightest COB strip available?”
Instead ask:
“What role does the cove play?”
If downlights provide the main functional illumination, the cove may only need to provide:
- Ambient light
- Architectural emphasis
- Visual depth
If the cove is expected to contribute significantly to general illumination, output requirements will be higher.
This is why lighting layers should be assigned specific functions.
Dimming Is Especially Valuable for Cove Lighting
Cove lighting can look dramatically different at different brightness levels.
During the day:
Higher output
During evening hospitality use:
Lower, warmer-feeling ambience
During cleaning or maintenance:
Higher output again
A compatible dimmable system gives the designer much more flexibility.
But the entire chain must be compatible:
Dimmer / Control → Driver → LED Strip
Where the dimming protocol is not fixed at the design stage, a 5-in-1 dimmable driver covers TRIAC, ELV, MLV, 0–10V and PWM in one unit.
Driver Selection
The driver must match the strip's voltage.
For example:
24V COB Strip → 24V Constant-Voltage Driver
Then calculate total connected wattage.
Use:
Total Strip Length × Watts per Foot = LED Load
Example:
40 ft of strip × 4 W/ft:
40 × 4 = 160W
The driver system must be sized appropriately for that load according to the manufacturer's specifications and project requirements — at an 80% planning load, a 200W driver would suit this example. Our guide on how many feet one driver can power works through the calculation in detail.
Do Not Forget Long-Run Voltage Drop
Cove lighting often involves long continuous architectural runs.
That makes voltage drop especially important.
Imagine a perimeter cove totaling:
80 ft
Even if the driver has enough total wattage, feeding the entire installation from one end may not produce consistent brightness.
You could see:
Bright → Bright → Medium → Dim
toward the far end.
The solution may involve:
- Multiple feed points
- Parallel runs
- Multiple drivers, such as a 288W transformer with three output channels
- Larger low-voltage wiring
- Better driver placement
The exact solution depends on the strip specifications and project layout.
Driver Capacity Is Not the Same as Maximum Strip Run
This is critical.
A driver may have enough wattage for:
60 ft of strip
but the strip itself may have a shorter recommended maximum feed length.
So always check two limits:
1. Total Driver Capacity
and
2. Maximum LED Strip Run per Feed
Do not confuse them.
Where Should the Driver Go?
Plan the driver location before the drywall is finished.
A driver should remain appropriately accessible for:
- Inspection
- Testing
- Replacement
- Troubleshooting
Do not create a beautiful plaster-in cove by permanently burying serviceable electrical equipment behind it. Drivers with an integrated junction box can simplify a serviceable installation, and driver temperature should be considered alongside access.
Possible locations depend on the project but may include:
- Accessible electrical closets
- Service cabinets
- Accessible ceiling locations
- Other approved service areas
Accessibility is part of good architectural lighting design.
Plan Wiring Before Drywall Finishing
Once BN5620 is plastered into the architecture, changing wire routing becomes much more difficult.
Before finishing, confirm:
- Driver location
- Controller location
- Feed points
- Cable path
- Wire gauge
- Strip connections
- Dimming/control wiring
The product page itself recommends coordinating the profile, LED strip, driver, wiring, and drywall construction before the wall or ceiling is finished.
This is one of the most important recommendations in this entire guide.
Installation Sequence
A professional BN5620 project should generally be planned in this order:
Step 1 — Design the Cove
Determine:
- Location
- Direction of light
- Viewing angles
- Length
Step 2 — Select the LED Strip
Confirm:
- Voltage
- Width
- Wattage
- CCT
- CRI
- Dimming requirements
Step 3 — Calculate Electrical Load
Determine total wattage and power-feed requirements.
Step 4 — Select Driver and Controls
Confirm compatibility and capacity.
Step 5 — Plan Wiring
Determine feed locations before drywall closes.
Step 6 — Install and Align BN5620
The profile needs to create a straight, consistent architectural line.
Step 7 — Integrate the Perforated Flanges
Finish the profile into the surrounding drywall/plaster according to the installation requirements.
Step 8 — Sand and Finish Carefully
The transition should visually disappear.
Step 9 — Install and Test the LED System
Verify strip placement, connections, polarity, voltage and controls.
Step 10 — Install the Diffuser
Check the complete optical effect.
Step 11 — Test From Normal Viewing Positions
Do not judge the result only while standing on a ladder beside the profile.
Alignment Is Critical
An 8-foot profile makes it possible to create long architectural lines with fewer sections, but larger projects will still require multiple lengths. BN5620 itself is supplied in an 8 ft length.
Where sections meet:
- Keep profiles straight
- Maintain consistent height
- Avoid twisting
- Align diffuser tracks
- Plan LED strip joints carefully
A tiny alignment error repeated across a long wall can become visually obvious once the light is turned on.
Avoid Putting Every Joint in the Same Location
Whenever possible, avoid aligning:
Channel Joint + LED Strip Joint + Diffuser Joint
at exactly the same point.
That can make one transition much more noticeable.
Staggering joints where appropriate can help create a more continuous finished appearance.
Test Before Applying Final Finish
This can save an expensive repair.
Before the project becomes difficult to access, test:
- LED strip
- Driver
- Controller
- Dimming
- Wiring
- All connections
- Brightness consistency
- CCT
- Long-run voltage drop
Finding a wiring problem after the architectural finish is complete is much more expensive than finding it during rough installation.
Create a Mock-Up Before a Large Project
For a hotel, restaurant, retail store, or major residential project, build a short sample.
Use the actual:
BN5620 + COB Strip + Diffuser + Driver + Finished Surface
Then evaluate it from the real viewing position.
Check:
- Light spread
- Brightness
- Hotspots
- Concealment
- Ceiling reflection
- CCT
- Dimming
- Finish quality
A four- or eight-foot test section can prevent repeating an undesirable effect across hundreds of feet.
BN5620 vs. a Standard Surface-Mount Channel
These products solve different problems.
Standard Surface-Mount Channel
Best when you need:
- Easy installation
- Existing construction
- Cabinet lighting
- Shelf lighting
- General linear lighting
The BN253 and low-profile BN252 cover most of these applications.
BN5620 Plaster-In Cove Channel
Best when you want:
- Built-in architectural cove lighting
- Concealed LED source
- Trimless drywall integration
- Indirect illumination
- New construction or major renovation
Plaster-in profiles generally require more installation planning and finishing than surface-mounted channels, but they can create a substantially more integrated architectural result. Our guide on recessed vs. surface-mount channels compares the two approaches in detail.
BN5620 vs. a Standard Recessed Channel
A normal recessed profile primarily places the LED strip inside a groove.
BN5620 goes further.
Its approximately 3.945-inch architectural height creates the physical cove structure needed for indirect lighting.
Think of the difference as:
Recessed Channel = Recessed Line of Light
versus:
BN5620 = Built-In Architectural Cove Producing Indirect Light
That distinction is important when specifying profiles for a project. For a flat trimless line rather than a cove, see the BN5615 plaster-in profile; for low-level wall details, the BN5619 baseboard channel; and for inside corners, the BN5618 drywall corner profile.
BN5620 vs. a Bendable Plaster-In Profile
If the project requires curved light lines, a rigid cove profile may not be the right solution.
BrightNex's BN5616, for example, is designed as a bendable plaster-in profile for curved walls, ceilings, and custom shapes.
BN5620 is better understood as a dedicated architectural cove-lighting profile, while a bendable profile solves a different design problem.
Choose the profile based on the architectural geometry. Our full aluminum profile range lists dimensioned drawings for each option.
Does Aluminum Help the LED Strip?
Yes. An aluminum profile provides a mounting surface that can help spread heat away from an LED strip.
This can be particularly useful for:
- Higher-output strips
- Commercial lighting
- Long operating hours
- Architectural installations
But the complete thermal performance depends on strip wattage, profile geometry, ambient conditions and installation method. Our guide on how aluminum channels help extend LED strip lifespan covers this in more detail.
Do not assume that simply putting any strip into any aluminum channel guarantees ideal thermal performance.
Common Cove Lighting Mistakes
Avoid these mistakes:
1. Choosing the Strip After the Drywall Is Finished
The strip and profile should be planned together.
2. Making the LED Source Visible
Check real viewing angles.
3. Using Too Much Light
Cove lighting should have a defined purpose.
4. Ignoring Surface Color
Indirect lighting depends on reflection.
5. Ignoring Voltage Drop
Long architectural runs require electrical planning.
6. Hiding the Driver Permanently
Keep serviceable equipment accessible.
7. Forgetting Dimming Compatibility
Driver, controls and strip need to work together.
8. Poor Profile Alignment
A crooked architectural light line is very difficult to hide.
9. Finishing Before Testing
Test the complete electrical system first.
10. Skipping the Mock-Up
For important projects, test the real materials before installing hundreds of feet.
A Complete BN5620 Cove Lighting System
Think of the installation as a complete system:
AC Power
↓
Compatible LED Driver
↓
Controller / Dimmer if Required
↓
↓
↓
↓
Diffuser
↓
Ceiling / Wall Reflection
Every part affects the final result.
The aluminum profile alone cannot compensate for:
- Incorrect strip selection
- Undersized driver
- Excessive voltage drop
- Poor wiring
- Bad positioning
Professional cove lighting comes from designing the entire system together. Our guide on building a complete LED lighting system walks through the selection process.
Who Is BN5620 Best For?
BN5620 is particularly relevant for:
- Electricians
- Lighting contractors
- General contractors
- Drywall contractors
- Architects
- Interior designers
- Lighting designers
- Builders
- Commercial project buyers
BrightNex specifically positions the profile for professional architectural projects and recommends coordinating its installation before finishing the wall or ceiling.
For contractors purchasing profiles for larger projects, the 8-foot length can also simplify planning for long architectural runs compared with assembling many short pieces. Contact our team for wholesale pricing on volume orders.
BN5620 Project Planning Checklist
Before ordering, confirm:
Architecture
- Cove location
- Total linear footage
- Wall or ceiling application
- Light direction
- Viewing angles
- Finished surface
BN5620
- Number of 8 ft profiles required
- Joint locations
- Diffuser layout
- Drywall integration
- Profile alignment
LED Strip
- PCB width
- Voltage
- Wattage per foot
- CCT
- CRI
- Maximum run length
- Dimming requirements
Electrical
- Total wattage
- Driver capacity
- Driver location
- Wire gauge
- Voltage drop
- Feed locations
- Controller capacity
Installation
- Rough wiring completed
- Profile securely aligned
- System tested before finishing
- Drywall/plaster finish inspected
- Diffuser installed
- Final lighting effect tested
Final Takeaway
Professional cove lighting is not simply an LED strip hidden behind drywall.
It is an architectural lighting system.
The BN5620 Plaster-In LED Cove Lighting Channel provides the physical structure needed to integrate that system into drywall or plaster while keeping the LED source concealed. Its 8 ft aluminum construction, approximately 3.945-inch architectural profile, 0.598-inch LED compartment, included diffuser, and perforated plaster-in flanges are specifically designed around this application.
The best results come when the entire project is planned together:
Architecture + BN5620 + COB Strip + Driver + Controls + Wiring + Surface + Light Direction
Do that before the drywall is finished.
The result is not simply an installed LED strip.
It becomes a clean architectural line of indirect light that appears to come from the building itself.
For commercial, hospitality, retail, and high-end residential projects, that is exactly what good cove lighting should achieve. If you are specifying a cove project, contact our team for dimensioned drawings, samples, and wholesale pricing.
Frequently Asked Questions
What is the BN5620 LED channel designed for?
BN5620 is specifically designed for plaster-in/recessed cove lighting in drywall or plaster construction, creating concealed indirect illumination along ceilings, walls, and architectural details.
How long is the BN5620?
Each profile is 8 feet long.
How large is the profile?
The overall profile height is approximately 3.945 inches, and the dedicated LED compartment is approximately 0.598 inches wide.
Does BN5620 include a diffuser?
Yes. The product includes a diffuser over the dedicated LED strip compartment.
Can I use COB LED strip with BN5620?
COB strip can be an excellent option for smooth architectural illumination, provided the actual strip width and other specifications are compatible with the profile. Always verify dimensions before installation.
Is BN5620 a regular recessed LED channel?
No. It is a larger purpose-built architectural cove profile. Its approximately 3.945-inch height helps create the actual cove detail rather than simply recessing a narrow LED strip into a surface, as a flush-mount profile does.
Should BN5620 be installed before or after drywall finishing?
It should be coordinated as part of the drywall/plaster construction. Its perforated flanges are designed to integrate into the finished surface.
Where should the LED driver be installed?
The driver should be installed in an appropriate accessible location while keeping wiring distance, voltage drop, thermal conditions, and applicable installation requirements in mind.
Can BN5620 be used for long commercial cove-lighting runs?
Yes, it is intended for professional architectural applications, but long runs require planning for profile joints, LED strip run limits, driver capacity, wiring and voltage drop.
Should I make a mock-up before a large project?
Yes. For large commercial or high-end projects, testing a short section with the actual profile, strip, diffuser, surface and driver can reveal issues with light spread, brightness, visibility and finishing before full installation.