
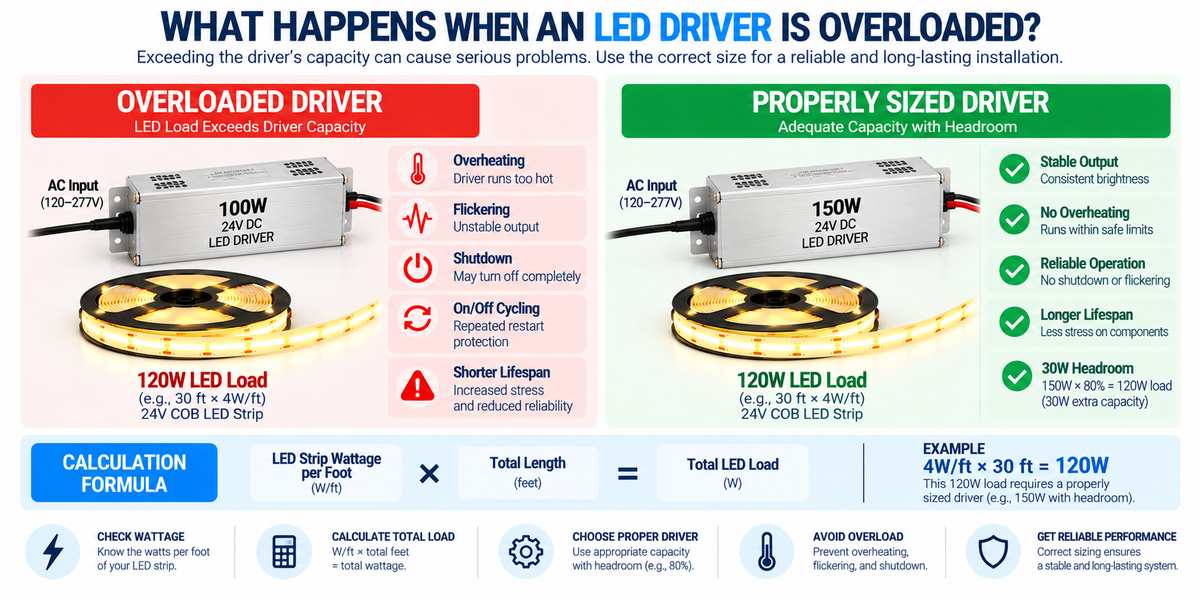
An LED driver is designed to supply a specific amount of electrical power.
If the connected LED load requires more power than the driver is designed to provide, the driver becomes overloaded.
For example:
LED Driver Capacity: 100W
Connected LED Load: 120W
The LEDs are asking the driver to deliver more power than its rated capacity.
What happens next depends on the driver's design and protection features.
A properly designed driver may:
- Limit its output
- Reduce voltage
- Shut down temporarily
- Cycle on and off
- Enter a protection mode
In other situations, excessive loading can contribute to:
- Flickering
- Unstable lighting
- Excessive heat
- Premature driver failure
- Reduced system reliability
For contractors, electricians, lighting designers, and installers, proper driver sizing is one of the most important steps in building a reliable LED lighting system.
What Does LED Driver Overload Mean?
An overload occurs when the connected electrical load exceeds what the driver is designed to supply under the specified operating conditions.
For a constant-voltage LED system, this often means the connected LED strips are demanding more current—and therefore more total power—than the driver can provide.
Remember:
Power (W) = Voltage (V) × Current (A)
For example, a 24V 100W driver has a theoretical rated output current of approximately:
100W ÷ 24V = 4.17A
If the connected load requires significantly more than the driver's allowable output, the driver may enter an overload condition.
A Simple Example
Suppose you have a:
24V 96W LED Driver
and connect:
30 ft of LED Strip
The strip consumes:
4 W/ft
Total load:
30 × 4W = 120W
But the driver is rated for only:
96W
The connected load exceeds the driver's rated capacity by:
24W
or:
25%
That is an overloaded system. A 150W driver would be the correct size for this load.
What Happens First?
There is no universal answer because LED drivers use different protection designs.
A quality driver may include protection against:
- Overload
- Short circuit
- Overtemperature
- Overvoltage
When an overload is detected, the driver may protect itself by changing or interrupting its output.
The exact behavior should be confirmed in the manufacturer's specifications. Protection features are listed on each driver product page.
1. The Driver May Shut Down
Some LED drivers respond to excessive load by shutting off their output.
The lights may suddenly turn off even though AC power is still reaching the driver.
After the overload is removed—or after the driver resets—the output may return.
This protective behavior can help prevent damage to the driver.
2. The Lights May Cycle On and Off
Another possible symptom is repeated cycling.
The sequence might look like this:
Driver Starts
↓
Load Exceeds Limit
↓
Protection Activates
↓
Lights Turn Off
↓
Driver Attempts Restart
↓
Overload Happens Again
This can produce lighting that repeatedly:
Turns On → Turns Off → Turns On → Turns Off
The behavior may be mistaken for a bad LED strip when the real problem is excessive load.
3. The LED Strips May Flicker
An overloaded driver can also contribute to unstable output.
One visible symptom may be:
Flickering
However, flickering does not automatically mean the driver is overloaded.
Other causes include:
- Dimmer incompatibility
- Loose connections
- Controller problems
- Incorrect wiring
- Failing components
- Voltage instability
Driver load should therefore be checked as part of the troubleshooting process.
4. The Driver May Run Hotter
As a driver approaches or exceeds its intended operating limits, thermal stress can become a concern.
Excessive operating temperature can affect electronic components inside the driver. Our guide on how temperature affects LED driver lifespan covers this in detail.
The actual temperature depends on:
- Driver design
- Load
- Efficiency
- Ambient temperature
- Ventilation
- Enclosure
- Installation method
A driver that feels warm is not automatically overloaded—LED drivers normally generate some heat.
But unusually high temperature combined with excessive load deserves investigation.
5. Output Voltage May Become Unstable
A constant-voltage driver is intended to maintain its specified output voltage within its operating range.
When pushed beyond its capacity, some drivers may no longer maintain normal output behavior.
Depending on the protection design, output may:
- Drop
- Pulse
- Shut down
- Restart
The result can be inconsistent LED performance.
6. Brightness May Become Unstable
If the driver cannot provide the required power, the LEDs may not operate normally.
Possible symptoms can include:
- Reduced brightness
- Flickering
- Pulsing
- Sections behaving inconsistently
- Complete shutdown
Do not assume that dim LEDs always mean the strip itself is defective. Dimming toward the end of a long run is usually voltage drop rather than a faulty strip.
Check the power system first.
7. The Driver's Lifespan May Be Reduced
Operating electronic equipment outside its specified conditions can increase stress.
Repeated overload conditions may contribute to:
- Higher thermal stress
- Protection cycling
- Component stress
- Reduced reliability
The exact effect depends on the driver design and protection system.
The safest approach is simple:
Do not design an LED installation around continuous overload.
Overload Protection Does Not Mean You Should Overload the Driver
This is an important distinction.
A driver may advertise:
Overload Protection
That does not mean it is acceptable to continuously connect more load than its rated output.
Protection features are designed to protect equipment during abnormal conditions.
They are not a substitute for correct system sizing.
Overload vs. Short Circuit
These are different electrical conditions.
Overload
The connected equipment requires more current or power than the driver is intended to provide.
Example:
100W Driver → 120W LED Load
Short Circuit
An unintended very-low-resistance connection causes excessive current.
For example, positive and negative conductors may accidentally contact each other.
A properly designed driver may have protection for both conditions, but the causes are different.
Overload vs. Voltage Drop
These problems are also frequently confused.
Driver Overload
The total connected load exceeds the driver's available capacity.
Voltage Drop
Voltage decreases through wiring or LED strip conductors because of electrical resistance.
You can have:
- Overload without significant voltage drop
- Voltage drop without driver overload
- Both problems at the same time
Each must be evaluated separately.
How to Know If Your Driver Is Overloaded
Start by calculating the connected LED load.
Use:
Total LED Load = Watts per Foot × Total Feet
Example:
LED strip:
4.5 W/ft
Length:
25 ft
Total load:
4.5 × 25 = 112.5W
Now compare this with the driver's allowable output. Wattage per foot is listed on every COB strip product page.
If the selected driver cannot support that load under its specified operating conditions, the system needs to be redesigned.
Include Every Load Connected to the Driver
A common mistake is calculating only one LED strip.
Suppose one driver powers three separate runs:
Run A = 35W
Run B = 40W
Run C = 30W
Total:
35 + 40 + 30 = 105W
The driver must be selected based on the combined load, not the largest individual run. A multi-output model such as our 24V 192W dual-output transformer provides separate terminals for each run while still sharing one capacity limit.
Driver Capacity Is Not the Same as LED Strip Run Length
A driver may have enough total wattage for many feet of LED strip.
That does not mean all of those feet should be connected as one continuous run.
For example:
Driver Capacity → 40 ft Total
but:
Recommended Strip Run → 20 ft per Feed
The installation might need:
20 ft Run + 20 ft Run
rather than one 40 ft run.
This helps address voltage drop and strip-current limitations. Our guide on how many feet one driver can power works through both limits.
Should You Use an 80% Load Rule?
A commonly used planning approach for some LED installations is to leave approximately 20% headroom.
For example:
150W Driver × 80% = 120W Planning Load
This can provide additional capacity instead of designing directly at the maximum rating.
However, the 80% approach is not a universal requirement for every LED driver.
Always follow:
- Manufacturer specifications
- Product loading requirements
- Applicable electrical codes
- Project design requirements
Example Using an 80% Planning Load
Suppose:
LED Load = 115W
Available driver:
At first glance, the driver appears large enough.
But if the project uses an 80% planning target:
120W × 0.80 = 96W
The 115W load exceeds that planning target.
A larger driver would therefore be selected under that design approach — in this case a 150W driver.
Calculate Required Driver Size
If you intentionally use an 80% planning load, you can calculate the driver size using:
Required Driver Wattage = LED Load ÷ 0.80
Example:
LED load:
120W
Calculation:
120 ÷ 0.80 = 150W
Therefore:
provides 120W of capacity at an 80% planning load.
Example: 60W Driver
Suppose you have:
and:
55W LED Load
The load is below the driver's 60W rating.
But it represents:
55 ÷ 60 × 100 ≈ 91.7%
of rated capacity.
Whether that is appropriate depends on the driver's specifications and the project's design requirements.
If an 80% planning target is being used, the load would be considered too high for that design target, and an 80W driver would provide the margin instead.
Example: 150W Driver
Suppose:
powers:
140W LED Load
The load is approximately:
93%
of the driver's rated output.
Again, this is not technically the same as exceeding the 150W rating, but it may leave less design margin than desired. A 200W driver would bring this load to 70% of rating.
Always distinguish between:
Actual Overload
and:
Exceeding a Chosen Planning Margin
They are not the same thing.
Why This Distinction Matters
It would be inaccurate to say:
“A 150W driver is overloaded at 130W because you should only use 80%.”
A 130W load is below a 150W rated output.
It may exceed an 80% design target, but that is different from an actual overload.
This distinction is important when troubleshooting professional lighting systems.
Can Adding More LED Strip Cause Overload?
Yes.
This is a common way overload occurs.
An installation may initially contain:
20 ft of LED strip
Later someone adds:
10 more feet
without recalculating the driver load.
The original driver may no longer have sufficient capacity.
Whenever additional LED strips are added, recalculate:
Total Connected Wattage
before making the change.
Different LED Strips Have Different Wattage
Do not size a driver using length alone.
For example:
Strip A
3 W/ft × 20 ft = 60W
Strip B
6 W/ft × 20 ft = 120W
Both installations contain:
20 ft
but Strip B requires twice as much power.
Our 8mm and 10mm COB strips are both 24V but draw different wattages per foot.
This is why the correct question is not simply:
“How many feet are connected?”
It is:
“What is the total connected wattage?”
Controllers Can Also Be Overloaded
The driver is not the only component with a power limit.
If the system uses:
Driver → Controller → LED Strip
the controller must also handle the required current.
Suppose:
Driver = 200W
Controller Capacity = 120W
LED Load = 150W
The driver may have sufficient capacity.
But the controller does not.
The system is still incorrectly sized.
Check Per-Channel Limits
This is especially important with:
A controller may have:
Total Maximum Current
and:
Maximum Current per Channel
Both limits must be respected.
Wiring Can Overheat Too
Excessive current does not only affect the driver.
If wiring is undersized for the load, conductors and connections can experience excessive heating and voltage drop.
Proper system design should consider:
- Current
- Wire gauge
- Wire length
- Connection quality
- Circuit protection
Do not increase driver capacity without checking the rest of the electrical system.
What If You Replace a Small Driver With a Much Larger One?
Suppose an overloaded 100W driver is replaced with a 300W driver.
That may provide sufficient wattage, but you still need to verify:
- Correct voltage
- Driver type
- Dimming compatibility
- Controller capacity
- Wiring
- Environmental rating
- Minimum-load requirements, if applicable
- Physical installation
A larger wattage number alone does not guarantee compatibility.
Voltage Must Match
If you have:
24V LED Strip
you need an appropriate:
Replacing an overloaded 24V driver with a high-wattage 12V driver is not a solution. Many of our dimmable drivers are switchable between 12V and 24V, so confirm the setting before connecting the strip.
Correct voltage comes first.
Then calculate wattage.
Dimming Compatibility Matters
An overloaded driver may appear to have a dimming problem.
But replacing it with another driver that uses the wrong dimming technology can create a different problem.
Verify compatibility with the project's dimming method, such as:
where applicable. Where the dimming method is not fixed at the design stage, a 5-in-1 dimmable driver covers several protocols in one unit.
Overload Symptoms Can Look Like Dimmer Problems
Suppose the lights:
- Flicker
- Shut off
- Restart
- Behave differently at different brightness levels
Possible causes include:
Driver overload
but also:
Dimmer incompatibility
or:
Troubleshooting should isolate each component rather than assuming the first suspected cause is correct.
Heat Can Make the Problem Worse
Imagine a driver operating near or beyond its intended capacity inside:
A small enclosed cabinet
with:
Poor airflow
and:
High ambient temperature
Now the system has two challenges:
Electrical Loading + Thermal Environment
The driver's thermal protection may activate even sooner.
This is why driver sizing and driver placement should be considered together.
Driver Location Matters
Drivers should be installed according to their specified environmental and ventilation requirements.
Avoid locations where excessive heat can accumulate unless the driver is designed for those conditions.
Examples requiring careful planning include:
- Small cabinets
- Ceiling cavities
- Electrical enclosures
- Millwork
- Outdoor boxes
Correct wattage does not eliminate thermal requirements. For tight millwork, our compact dimmable transformers are easier to distribute and ventilate than one large unit.
Commercial Projects Need Extra Planning
Overload becomes especially important when one driver supplies several lighting zones.
For example:
Driver
↓
Zone A – 40W
Zone B – 35W
Zone C – 50W
Zone D – 45W
Total:
170W
The driver must support the combined load under the specified design conditions — a 288W transformer would carry this load with margin and provide separate output channels.
A mistake in one central calculation can affect multiple lighting areas.
Example: Retail Display
Suppose one 150W driver supplies four illuminated shelves.
Each shelf uses:
32W
Total:
32 × 4 = 128W
The driver is not technically overloaded based only on a 150W nameplate rating.
However, the designer should verify:
- Manufacturer loading requirements
- Desired design margin
- Wiring distances
- Controller capacity
- Thermal conditions
If another 32W shelf is later added:
128 + 32 = 160W
Now the connected load exceeds the 150W rating.
The system needs to be redesigned — a 200W driver would support the expanded load.
Example: Commercial Cove Lighting
Suppose a cove contains:
50 ft of COB LED strip
at:
4 W/ft
Total load:
50 × 4 = 200W
Connecting the entire system to a:
150W Driver
would exceed the driver's rating.
Possible solutions include:
- Selecting an appropriately sized larger driver, such as a 300W unit
- Dividing the installation across multiple drivers
The correct choice depends on the project layout, controls, wiring, and strip run limits.
Multiple Drivers Can Reduce the Consequences of Failure
For large installations, dividing the load across multiple drivers can offer advantages.
Instead of:
One Driver → Entire Installation
you might use:
Driver A → Zone 1
Driver B → Zone 2
Driver C → Zone 3
Potential benefits include:
- Easier troubleshooting
- Shorter low-voltage wire runs
- Better zoning
- Reduced impact if one driver fails
The ideal architecture depends on the project. Our driver range runs from 30W to 300W so each zone can be matched to its own load.
Troubleshooting an Overloaded LED Driver
If you suspect overload, use a systematic process.
Step 1 — Identify the Driver
Check:
- Output voltage
- Rated wattage
- Rated current
- Load requirements
Step 2 — Calculate the LED Load
Use:
Watts per Foot × Total Feet
for each connected LED strip.
Step 3 — Add All Loads
Include every branch connected to the driver.
Step 4 — Check Controllers
Verify total and per-channel limits.
Step 5 — Inspect Wiring
Check:
- Wire size
- Connections
- Distance
- Damage
Step 6 — Check Temperature
Look for excessive heat and poor ventilation.
Step 7 — Compare With Manufacturer Specifications
Determine whether the actual system is operating within the driver's rated conditions.
Do Not Diagnose by Touch Alone
A hot driver is not proof of overload.
Drivers naturally generate heat.
Likewise, a driver that does not feel extremely hot can still be incorrectly loaded.
Use:
- Electrical specifications
- Load calculations
- Appropriate electrical measurements
- Manufacturer data
rather than temperature by touch alone.
Warning Signs Worth Investigating
Possible signs of a driver or system problem include:
- Repeated shutdown
- On/off cycling
- Unexpected flickering
- Unstable brightness
- Excessive temperature
- Driver protection activating
- System working briefly and then turning off
- Problems appearing after more LED strips were added
These symptoms do not prove overload, but they justify checking the connected load.
Common Causes of LED Driver Overload
Overload often happens because of:
- Incorrect wattage calculations
- Adding LED strips later
- Using higher-wattage replacement strips
- Ignoring multiple branches
- Selecting a driver based only on strip length
- Forgetting controller loads and limits
- Assuming nominal wattage is always exact
- Using an undersized driver to reduce cost
- Not checking project modifications
How to Prevent LED Driver Overload
A reliable design process is straightforward:
1. Confirm voltage
2. Find watts per foot
3. Measure total strip length
4. Calculate total wattage
5. Include every connected run
6. Apply the appropriate design margin
7. Select a compatible driver
8. Verify controller capacity
9. Check wiring and voltage drop
10. Confirm environmental and dimming requirements
Do this before installation—not after the lights begin flickering. Our guide on building a complete LED lighting system covers the full process.
Quick Driver Sizing Example
LED strip:
24V COB
Power:
4 W/ft
Length:
30 ft
Total load:
4 × 30 = 120W
If the project uses an 80% planning target:
Required Driver = 120 ÷ 0.80
Required Driver = 150W
Therefore:
150W driver → 120W planning load
This creates approximately:
30W of headroom
under that design approach.
Driver Overload Checklist
Before powering the installation, confirm:
Driver
- Correct voltage
- Sufficient wattage
- Appropriate load range
- Correct dimming method
- Suitable environmental rating
LED Strip
- Correct voltage
- Watts per foot confirmed
- Total length calculated
- Maximum run length checked
Controller
- Correct voltage
- Total current capacity
- Per-channel limits
- Total wattage capacity
Wiring
- Appropriate gauge
- Suitable current capacity
- Voltage drop considered
- Connections secure
Installation
- Driver ventilation adequate
- Ambient temperature acceptable
- Driver accessible
- All zones included in load calculation
Drivers with an integrated junction box can help keep the installation accessible for future load checks.
Overload vs. Correctly Sized System
Overloaded System
100W Driver → 120W LED Load
Possible result:
Protection / Flicker / Shutdown / Excess Heat / Unstable Operation
Properly Sized System
150W Driver → 120W LED Load
Example with an 80% planning target:
Stable Capacity + 30W Headroom
The exact driver selection should always follow the specifications of the actual products being used.
Conclusion
An overloaded LED driver is being asked to supply more power than it was designed to provide.
Depending on its protection design, the result may include:
Shutdown + Cycling + Flickering + Unstable Output + Excessive Heat
Repeated operation outside the driver's specified limits can also reduce system reliability.
The best solution is not to wait for these symptoms.
Calculate the load before installation:
Total LED Load = Watts per Foot × Total Feet
Then verify:
Driver Capacity + Voltage + Controller Capacity + Wiring + Run Length + Dimming + Environment
For large commercial LED installations, also calculate every branch connected to the same driver.
A properly sized driver is not simply about making the LEDs turn on.
It is about creating a lighting system that operates reliably, predictably, and within the specifications of every component.
If you would like a driver schedule checked before you order, contact our team for sizing support and wholesale pricing.
Frequently Asked Questions
What happens if I connect too many LED strips to one driver?
If the total load exceeds the driver's capacity, the driver may enter protection mode, shut down, cycle, produce unstable output, or operate under excessive thermal stress depending on its design.
Can an overloaded LED driver cause flickering?
Yes, overload can contribute to flickering or unstable operation, although dimmer compatibility, wiring, controllers, and other faults can cause similar symptoms.
Will an overloaded LED driver shut off?
Some drivers include overload protection that reduces or shuts down output. The exact behavior depends on the driver's design.
Can overloading damage an LED driver?
Operating outside the driver's specified limits can increase electrical and thermal stress. Protection circuits may help, but they should not be relied upon for continuous overloaded operation.
Is a 150W driver overloaded with a 130W LED load?
Not based solely on the 150W rated-output figure. However, 130W exceeds an 80% planning target of 120W if that design margin is being used. Always distinguish between the driver's actual rating and a chosen design margin.
How do I know whether my LED driver is overloaded?
Calculate the combined wattage of all connected LED loads and compare it with the driver's specifications and allowable operating range.
Can I fix an overload by installing a larger driver?
Potentially, but the replacement must also have the correct voltage, driver type, dimming compatibility, environmental rating, and suitable electrical characteristics. Controllers and wiring must also support the load.
Should I always use only 80% of an LED driver's capacity?
No universal 80% rule applies to every LED driver. It is a commonly used planning approach in some installations. Follow the manufacturer's specifications and applicable electrical requirements.