A driver that is barely large enough on paper usually becomes the problem on site. Flicker at startup, nuisance failures, dimming issues, and callbacks often trace back to one basic mistake: the power supply was sized too close, sized for the wrong voltage, or selected without accounting for real installation conditions. If you want to know how to size LED power supply products correctly, start with load, voltage, dimming method, and environment - not just wattage printed on the reel.
For trade buyers, this matters even more on premium residential work. Clean dimming, long-term reliability, and code-friendly installation are expected in luxury homes, retail displays, hospitality spaces, and custom millwork. The right driver protects the LED load, supports the control system, and gives the installer enough margin to avoid heat-related failures.
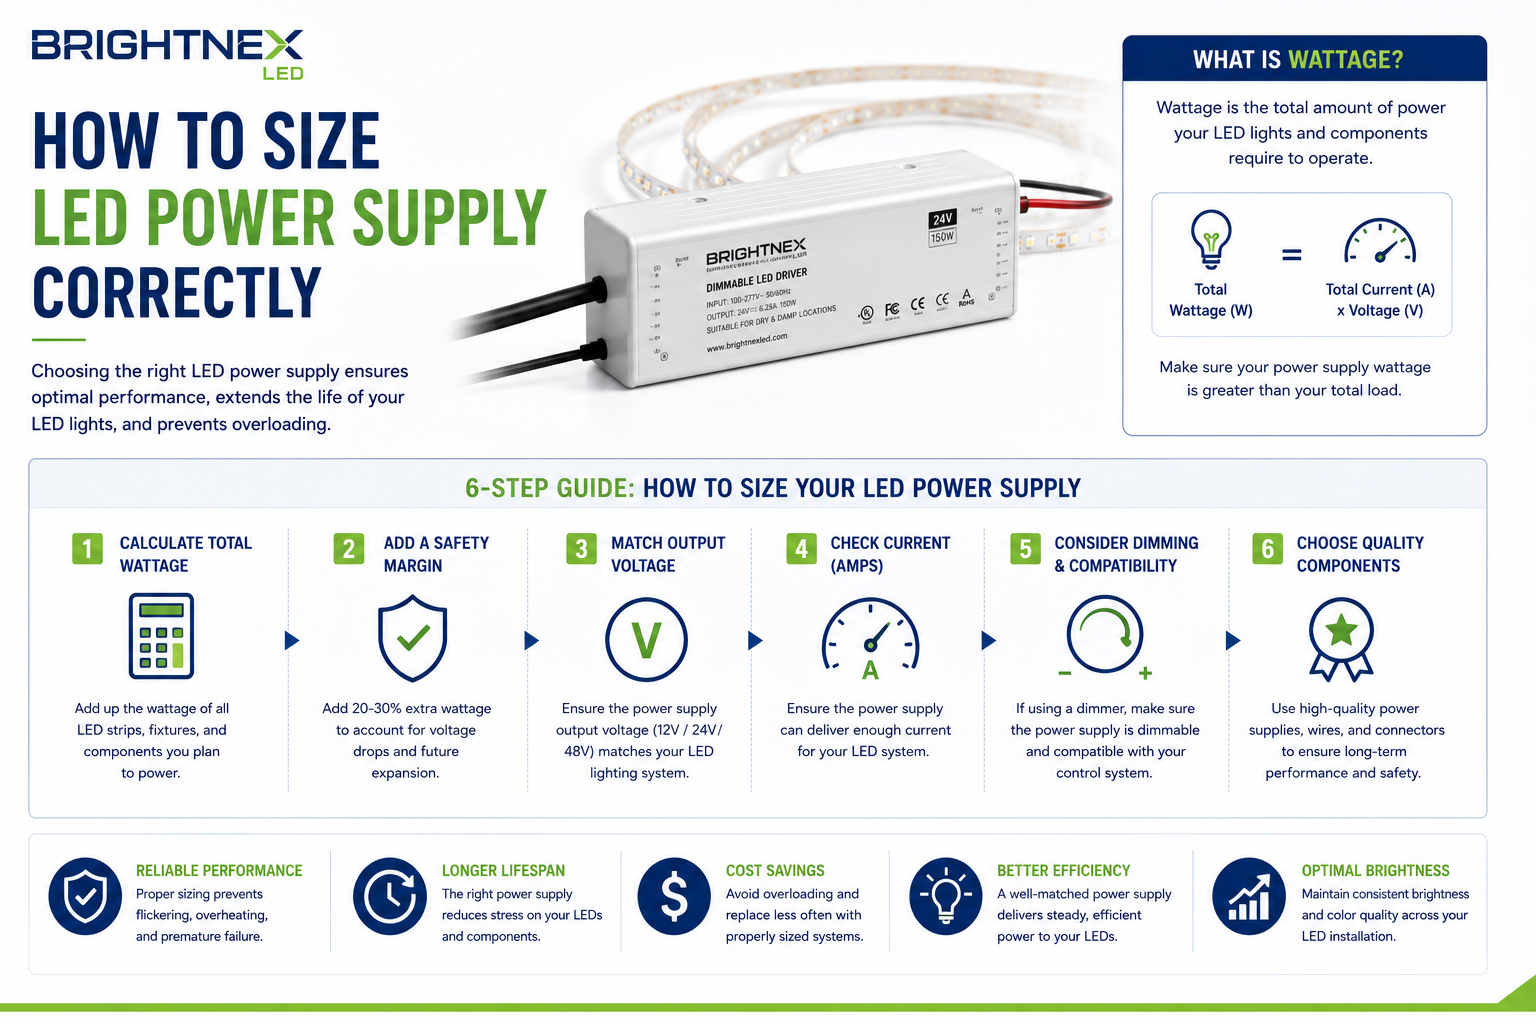
How to size LED power supply for LED loads
The first step is matching output voltage to the LED product. Most strip lighting projects will be either 12V DC or 24V DC. That is not a flexible spec. A 24V strip needs a 24V power supply, and a 12V strip needs a 12V power supply. Using the wrong voltage will damage product or cause immediate performance issues.
Once voltage is confirmed, calculate total wattage. For LED strip lights, multiply watts per foot by total installed footage. If a strip is rated at 5 watts per foot and the run is 16 feet, the connected load is 80 watts. If the project uses multiple runs on one driver, add all runs together.
After that, add headroom. A common professional rule is to size the driver at 20% above the calculated load. So an 80-watt load should typically use at least a 96-watt driver, which usually means moving up to the next standard size such as 100W. That margin helps with thermal performance, startup behavior, and service life.
If the application will run long hours, sit in a warm enclosure, or operate in a demanding environment, more margin is often the smarter call. Tight driver sizing may save a few dollars on a quote, but it usually costs more in replacements and labor.
The basic sizing formula
For most constant-voltage LED strip projects, the formula is simple:
Total load wattage = strip wattage per foot x total feet installed
Minimum driver size = total load wattage x 1.2
As an example, assume you are installing 24V COB strip at 4.4 watts per foot across 30 feet of cabinetry. The total connected load is 132 watts. Multiply by 1.2 and you get 158.4 watts. In practice, that means selecting the next available size above that number, such as a 160W or 192W driver depending on the product family and dimming type.
That last point matters. Driver sizing is not only about wattage. Available sizes change by dimming platform, enclosure style, Class 2 limits, and location rating. The right answer on a TRIAC dimming job may differ from the right answer on a 0-10V specification, even when the LED load is the same.
Don’t forget amperage
Amperage should also be checked, especially on larger 12V systems. Power equals voltage times current, so current draw can rise quickly at lower voltage. A 96W load at 12V draws 8 amps. That affects wire sizing, voltage drop, connection points, and sometimes the practical decision to move the project to 24V instead.
For long linear runs, 24V systems are often easier to manage because current is lower for the same wattage. That usually improves voltage drop performance and can reduce stress on wiring and connectors.
Dimming changes the sizing conversation
A driver can have the right wattage and still be the wrong product. Dimming compatibility has to be checked before finalizing the power supply.
If the control system is TRIAC, ELV, MLV, or 0-10V, the driver has to match that dimming method. Some dimmable drivers also specify minimum load behavior or perform best when not loaded to the limit. That is especially relevant on premium residential jobs where smooth, low-end dimming is part of the expectation.
For example, a kitchen with under-cabinet COB strip in a high-end Los Angeles home may technically run on a smaller dimmable driver, but if the dimmer and driver combination performs better with more headroom, the better specification is the one that delivers cleaner dimming and fewer field adjustments. Professionals know that the cheapest fit is not always the best fit.
Constant-voltage vs constant-current
Most LED strip systems use constant-voltage drivers. Many architectural fixtures, modules, and some downlights may use constant-current drivers instead. Those are sized differently. Instead of matching a fixed 12V or 24V output, you match the driver’s output current, then make sure the voltage range supports the LED load.
If the fixture calls for 700mA constant current within a certain voltage range, that exact electrical profile matters more than the total wattage alone. Never treat constant-current and constant-voltage products as interchangeable.
Installation environment affects driver choice
Sizing does not stop at electrical load. The installation location matters.
If the driver is going in a wet, damp, or dry location, the enclosure and rating must match the environment. Heat also matters. A driver installed in a tight millwork cavity or above insulation may run hotter than one mounted in open air. Higher ambient temperatures reduce real-world margin, which is another reason to avoid sizing a unit right up to its maximum capacity.
Professional buyers should also pay attention to code and jobsite requirements such as Class 2 limitations, accessible placement, and junction box integration. Drivers with junction boxes can simplify compliance and installation workflow, especially on projects where wet, damp, and dry location use must be clearly covered.
Common mistakes when sizing LED drivers
The most common error is ignoring the safety margin. If the strip load is 100 watts, specifying a 100-watt driver leaves no room for normal variation, heat, or startup behavior.
The next mistake is mixing voltage. A 12V driver on a 24V strip is just as problematic as the reverse. Another frequent issue is calculating only one run and forgetting to add the rest of the connected load on multi-zone cabinetry, cove lighting, or display shelving.
Dimming mismatch is another expensive one. A contractor may size wattage correctly, then pair the load with a non-compatible dimmable driver and spend hours troubleshooting flicker that was never caused by the strip itself.
Finally, many installers underestimate voltage drop on long runs. The driver may be sized correctly, but if feed length, wire gauge, and injection points are not planned properly, light output can still become uneven.
A practical example for strip lighting
Say you have four runs of 24V RGBW strip, each 12 feet long, rated at 7 watts per foot. Total footage is 48 feet. Total load is 336 watts. With a 20% buffer, required driver capacity becomes 403.2 watts.
At that point, one oversized driver may not be the best answer. Depending on layout, controls, wire distance, and channel configuration, splitting the load across multiple compatible power supplies may produce a cleaner installation. It can reduce voltage drop, improve serviceability, and make zoning easier. This is where experienced project sourcing matters more than raw math.
On wholesale jobs, this is also where product consistency helps. Using UL-listed strip lights and drivers with clearly matched voltage, dimming type, and environmental rating reduces field risk. BrightNex LED focuses on that compatibility because trade buyers need dependable inventory, not trial-and-error substitutions.
When to go bigger and when not to
More wattage is not automatically better. Oversizing within reason is smart. Gross oversizing without checking dimming behavior, minimum load expectations, or physical fit is not.
A driver should be large enough to run cool and stable, but still appropriate for the control method and application. If a small accent run only draws 18 watts, a massive driver may create its own issues depending on the product design. The goal is not the biggest unit available. The goal is the right unit with the right margin.
For most strip lighting projects, the best process is straightforward: confirm voltage, calculate total wattage, add at least 20% headroom, verify dimming compatibility, and check environmental and installation requirements. That is how professionals avoid callbacks and protect finish-level work.
If you are buying for projects where appearance, reliability, and inspection readiness all matter, treat driver sizing as part of the lighting system, not an accessory decision. The cleanest installs usually start with the power supply being specified correctly from the beginning.